Friday, December 16, 2011

Fast Food Friday: Poinsettia Sipper

This is a drink that my husband's family has long made at this time of year, and it is now a favorite with my family as well. I'm generally a fan of hot mulled beverages, and this makes a tasty alternative to egg nog or hot chocolate. Since it's appropriate for fasting, it's nice to serve for the Feast of St. Nicholas. We like to drink it as we decorate our Christmas tree, and it would be great in a thermos for looking at Christmas lights.

Apparently the recipe was originally published in Cooking Light, but this is our own slight variation, which James and I feel we have perfected over the past several years. We frequently double or triple the quantities, but this amount is works for just a few people. We often mix up a batch on Sunday afternoons this time of year, and it makes the house smell wonderful.
Poinsettia Sipper
2 cups water
2 cups apple juice
2 cups cranberry juice blend (I prefer 100% juice blends, not cranberry cocktail. Cranberry Pomegranate blends are my favorite.)
2 Tbs. sugar (optional)
2 cinnamon sticks
4 whole cloves
The juice of one clementine (2 Tbs. orange juice can be substituted, but freshly squeezed is preferred)

Stir together all the ingredients in a pan over medium heat until sugar dissolves (if using) Simmer for 20-30 minutes, and serve when it smells lovely. Note that if you double the recipe there is no need to add more cinnamon sticks.

Monday, December 12, 2011

Hanging Around

The headboard did get hung up. We've been enjoying it for about a month now. You can see we also hung up some pictures. These are some wedding pictures, and they were hanging on a different wall before. We ended up abandoning the flush mounts to hang the headboard, as the ones we bought were not intended for something this big. Instead, James bought some other brackets with eye holes. He attached two of them to the top board on the back of the headboard. Then he screwed two wood screws into the studs in our wall, and hung the headboard from the wall by hanging the brackets from the screws. I wasn't around for this, so I don't have pictures. I'm not sure what kind of brackets they were or the exact steps of the installation. I'm sure it involved measuring and a level, and if anyone is on the edge of their seat waiting for details I can probably get James to answer questions in the comments.
I did a little tweaking of the headboard by tucking some squares of the fabric into the spots at the corners of the panels. Because of the rounded edges, the corners didn't quite meet, and the boards behind the panels showed through at some angles, as you can see above. I probably should have attached fabric to the boards before we attached the panels since it was a little tricky tucking the fabric into these small gaps. It's a small thing, but it makes the headboard look more finished. Below is the new and improved close-up. I've got some other bedroom decorating projects in the works, but things have slowed down in there a bit while I focus on preparing for Christmas. I do have some projects I've completed that I haven't shared here yet, so I hope to talk about those in the next week or so.
And I'm excited to share this picture sent to me by Laura, who made her own paneled headboard with canvases. I love how the same concept has a totally different look with a different fabric and canvas configuration. I really like the square canvases she used, and how they fit perfectly under her window. I think her headboard turned out great, and it was really fun seeing a project inspired by mine. Thanks so much for sharing, Laura!

Thursday, December 8, 2011

Open to Interpretation

Remember way back in August when I did the 21 Day Challenge and I managed something unheard of for me and posted every day for 21 days in a row? And I posted awkward photos of what I wore? I had a lot of fun and thought about clothes in a different way. I'm not gonna lie to you, I still frequently go with my standard method of wearing anything that doesn't need ironed (and one thing I love about fall and winter is that my sweaters usually don't require ironing). But at least some of the time I'm trying to apply what I learned and accessorize, layer my clothes, and wear scarves and belts. I feel really fancy when I bother with that. :)

Well, today Kayla, who organized the 21 Day Challenge, is hosting another fashion challenge, along with bloggers Amy and Erica. They do this fun thing called Open to Interpretation where they choose an image with a look they like and then they create an outfit inspired by that one. And they've invited everyone to play along this time, so I thought I'd join in.

Here's the inspiration outfit:

Unfortunately the original source is unknown.

And here is my outfit:


Sweater:Ann Taylor Loft c/o my mom, t-shirt: Gap via Goodwill, pants: Goodwill (no idea what brand), Shoes: Kohls, Necklace: made by me.

Textured oatmeal sweater? Check. Layered with a striped tee? Check. Big furry earflap hat? Ummm, no. Red skinny jeans? Sorry. Brown booties? Nope.  I actually tried a bunch of possibilities for the bottom half of this outfit before I went with this. I have some red tights, and I was really hoping to make those work, but I didn't like any of the skirts or shorts I tried with it. Oh, well. Camel colored cords it is. I tried my brown boots with this, too, but it was a no go. So this is what we've got. And I took a bunch of pictures and even experimented with the timer, and, sadly, this really was the best I could do. But check out my new specs!

And go check out all the other interpretations:


Freckles in April OTI

Tuesday, December 6, 2011

Feast of St. Nicholas

Blessed feast to you. Most people can't help but love St. Nicholas, and he is special to James and me because he was the patron of the church where we began inquiring about the Orthodox faith. We try to go there to celebrate the feast each year. Since James is working 50-60 hours a week right now, rather than going there for liturgy today, we went on Sunday when they had a meal in honor of their Patron. It turned out to be a good thing, because today would not have been a good day for me to be in the car.
I thought it would be fun to share a bit of the tradition of St. Nicholas with my co-workers this year. I made up these little bags of  "gold" to take them. Each one contains chocolate coins, a clementine and some mini candy canes. The bags are actually just squares cut from a T-shirt tied with ribbon. I like to re-purpose things for wrapping, and the simple bags are meant to evoke the bags of gold St. Nicholas is said to have given for dowries. According to tradition, St. Nicholas anonymously tossed a bag of gold into the window of an impoverished family on three different occasions, for each of three daughters. This saved the girls from being sold into slavery or prostitution. The bags of gold are said to have landed in the shoes of the girls set out by the fire to dry, and that's the basis of the tradition of setting out shoes or stockings to be filled with gifts on this feast and at Christmas time.
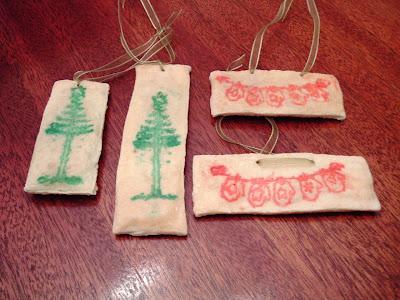
To personalize them for my co-workers, I made these salt dough gift tags/Christmas tree ornaments. I got the idea for them on Pinterest, where I kept seeing lovely ones like this:

It seemed simple enough, but isn't that always the way with crafts? I made some, and I think they're pretty cute, but they are a lot more rustic and homemade looking than what I was envisioning. It's true that they are simple enough to make. You just mix 2 parts flour to 1 part water and 1 part salt to make the dough. For little tags like these 1/2 tablespoon for each part times however many tags you want should about do it, with a little extra for mistakes. I definitely made mistakes!  Stamping letters backwards, not allowing enough room for the whole name...I started over several times. Once you've mixed as much dough as you need, knead it a little, roll it out about a quarter inch thick, cut your shapes, then stamp away. I stamped them on one side with my co-workers' names and the other side with a decorative stamp. The Christmasy stamps were part of the bounty from my mom's basement when she and my dad downsized their house, and the letter stamps I've had since I was a kid. The ribbon for the hangers is from my wedding. Spur of the moment crafters benefit from a slight tendency to hoard things. :)
So after I stamped them, I poked holes in them with the insert to a ball point pen and then I baked them at 325 for about a half hour. I've now seen other recipes say to bake at 250, and maybe they wouldn't have browned quite so much if I'd gone that route. I also recommend that you line your baking sheet with foil if it is not pristine, as the salt dough can pick up oil baked onto the sheet (Not that I would know, from experience, ahem.) Once they were cool, I gave them a few coats of Modge Podge for preservation, and I threaded some ribbon through them as hangers. I tied them to my little bags, and they're ready to go.
Naturally, I planned to give them to my co-workers today, but I'll keep it real by disclosing that I completely forgot to give them out! I spent the morning in a meeting with librarians from other libraries, and then had to leave work with a migraine. I'll have to pass them out tomorrow. I've only had a few migraines in my life, thankfully. I came home and slept, and I feel fine now.

Monday, December 5, 2011

Drumroll Please...

...And the winner is:
Rebekah of Verdant Bents


The winning number 4 was generated at random.org.

I'll be in touch with you about the prize, Rebekah.

Thanks so much everyone for your kind words about my blog. I wasn't fishing for compliments. :) I thought maybe feedback would help me find some focus for my random ramblings. I guess writing about whatever's on my mind at the moment will lead me to hit publish the most frequently, and that definitely means more talk about the house will be forthcoming.

Friday, December 2, 2011

Fast Food Friday: Peanut Butter Pasta

We often eat this meal on fasting weeknights because it is quite quick and easy. This recipe is loosely based on one from When You Fast...Recipes for Lenten Seasons by Catherine Mandell. It contains essentially the same ingredients, but she doesn't recommend natural peanut butter for her sauce, whereas I prefer it. And, over the years, my version has diverged quite a bit from the original. I've changed the type of pasta, the ratio of ingredients in the sauce, and the preparation method to suit my own taste and cooking style. I'm finding the blog is handy way to keep a record of my recipe variations. So many things I ostensibly make from a cookbook, but in reality prepare very differently than the recipe as printed.


Peanut Butter Pasta

3/4 lb. whole wheat spaghetti
3-4 carrots, julienned (sometimes I go with ribbons instead of matchsticks)
1 head of broccoli, chopped or 1 16 oz bag frozen broccoli
5 Tbs. natural peanut butter
7 Tbs. low sodium soy sauce
1 Tbs. lime or lemon juice
1-2 Tbs brown sugar (try the sauce with 1, and if you'd like it to be sweeter, add another)
2 cloves minced garlic
Hot Sauce, to taste (I often skip this, as James doesn't care for spicy foods, but it's good with it, too)

Bring a large pot of water to boil. Meanwhile, chop your carrots and broccoli. When water comes to a boil, add your pasta and boil for 5 minutes. Add the carrots and broccoli and boil 5 minutes more.  Drain and return to pot. While the pasta and vegetables are cooking, whisk together the ingredients for your sauce. Stir the sauce into the pasta and vegetables. I use a silicone spatula to scrape all the sauce out of the bowl.